Introduction
ProAudioDeclipper is a plugin developed by MyAudioFactory. It is a powerful real-time audio processing tool that enhances audio quality by restoring the original dynamic range of clipped and saturated audio, effectively eliminating distortion caused by clipping and saturation.
Unlike traditional declipper algorithms, ProAudioDeclipper uses anInnovative Algorithmto restore the original signal from clipped data. In many cases, the result is indistinguishable from the original, unclipped recording.
ProAudioDeclipper is an automatic audio de-clipping tool that requires minimal interaction. It can automatically detect clipping and saturation artifacts and restore them. Additionally, it features a soft peak limiter to adjust the final output level.
How to Install
For Windows
- Unzip the downloaded
ProAudioDeclipper_Plugins_Installer.zipfile - Right-click the
vst3_installer.batorvst_installer.batscript - Run it as an administrator
For macOS
- Run the downloaded
ProAudioDeclipper_Plugins_Installer.pkg - Follow the prompts in the Apple installer to complete the installation
After installing the plugins, most Digital Audio Workstations (DAWs) can find the installed plugins automatically after being reopened. If not, you may need to manually rescan for plugins from the DAW's options.
How to register with Activation Code
- Copy your activation code to the text field located in the license window
- Click "Confirm"
Free Trial
If you would like to take advantage of a free trial, start ProAudioDeclipper and click the "FreeTrial" button in the license window.
Trial Limitations
- Limited to specific days with restricted features
- Total duration for processed audio files: 2000 seconds
- Processed audio contains random 1-second silence intervals every 20 seconds
If the trial restrictions hinder your experience, feel free to reach out to us to get an unlimited trial version.
How to Transfer an Online License to Use on Different PCs
- Once you activate the plugin with an online license activation code, a "Deactivate" button will appear on the license window
- Click the "Deactivate" button on the current PC to release the license
- Use your online license activation code to activate the plugin on other PCs
How to register with License File
The License File is designed to activate the plugin on a PC without an internet connection.
- Click the 'Request' button in the license window, save the request file, and send it to MyAudioFactory
- MyAudioFactory will send back a License File based on your request file
- Click the 'License File' button in the license window to select the provided License File
- Click the 'Apply' button to activate the plugin
How to change a Setting value
- Sliders can be adjusted by dragging or using the mouse wheel
- For more precise value changes, hold the SHIFT key while adjusting the slider
- Edit values directly by double-clicking the value field
Important Note for Real-Time Mode
When the plugin operates in real-time mode, changes to settings take effect immediately. However, adjusting the "SpeedVsQuality" or "Look-ahead samples" settings during playback may result in a short-term audible artifact (known as a 'spark').
Recommendation:Make these adjustments when the plugin is not in playback mode or when it is in a stopped status.
The 'Real-Time Mode' indicator on the user interface confirms that the plugin is operating in real-time mode.
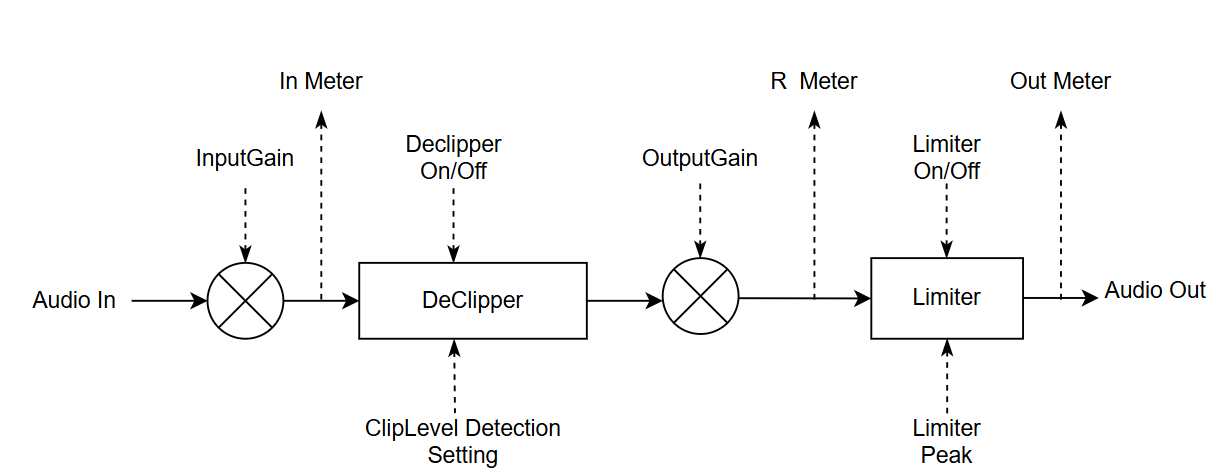
Settings
Generally, you do not need to change the settings, as the default configuration can handle most cases. However, if you wish to enhance performance beyond the default settings, please follow the introductions below.
Declipper Settings
| Setting | Description |
|---|---|
| 1. Declipper On/Off Switch | Enable or bypass de-clipping processing. When bypassed, input gain, output gain, and Limiter can still work normally. |
| 2. InputGain | Input gain applied to audio samples before de-clipping processing. When "DynamicThreshold" is enabled, adjust input audio to have a clipping level greater than -12 dB (ideally at least -20 dB) for improved clip detection accuracy. |
| 3. OutputGain | Output gain applied to audio samples after de-clipping processing. |
| 4. SpeedVsQuality | Balance parameter between processing speed and restoration quality. Higher values = better quality, lower values = faster processing. Recommended value: 3 or 4 for most scenarios. |
| 5. Processors | Number of CPU processors utilized for de-clipping. Directly affects processing speed. Using multiple processors can significantly accelerate the de-clipping process. See Usage Tips and Running Mode for detailed configuration guidance. |
| 6. Look-ahead samples | Enhances restoration of original samples. More look-ahead samples = better restoration quality but requires more computational power and increases latency. |
| 7. Fix glitch On/Off Switch | Enables or disables correction of significant audio glitches. |
| 8. LimiterPeak | Determines the peak value of output audio when the limiter is enabled. |
| 9. Limiter On/Off Switch | Applies a low-distortion limiter to the final audio output. Bypassed when turned off. The limiter's peak value is determined by the LimiterPeak parameter. |
Declipper Detection Settings
| Setting | Description |
|---|---|
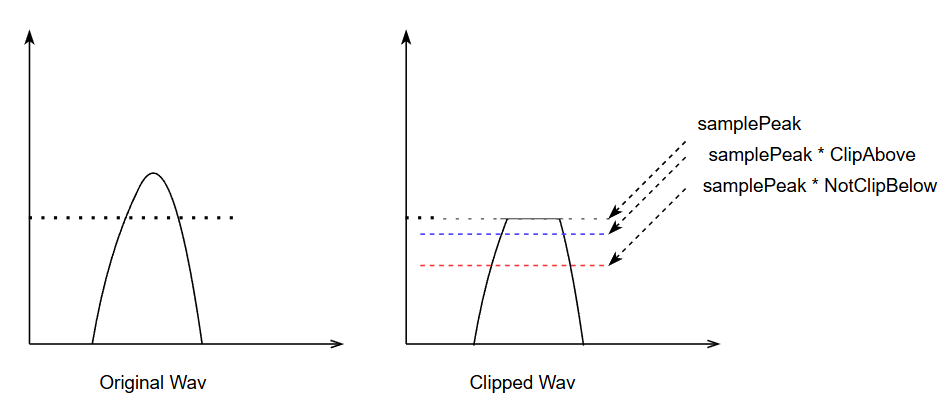
| 1. Dynamic Threshold | When disabled: Samples greater than the red line (NotClipBelow) are treated as clipped. When enabled: Algorithm finds an optimal clip level between the red (NotClipBelow) and blue (ClipAbove) lines. Samples exceeding this optimal level are treated as clipped. Internal restriction: Red line is always lower than the blue line. |
| 2. ClipAbove | Scale value for the high threshold of clip level (blue line in Figure 2). Typical value: 98% to 100% (0.98~1.0). Audio samples larger than (Sample Peak × ClipAbove) are treated as clipped and will be restored. |
| 3. NotClipBelow | Scale value for the low threshold of clip level (red line in Figure 2). Typical value: 99% to 25% (0.99 ~ 0.25). Audio samples smaller than (Sample Peak × NotClipBelow) are treated as unclipped and will not be modified. |
| 4. NotClipAmp | Samples smaller than NotClipAmp are never considered clipped. Prevents extremely low NotClipBelow values. If the red line (NotClipBelow) is lower than NotClipAmp, it will be restricted to NotClipAmp. |
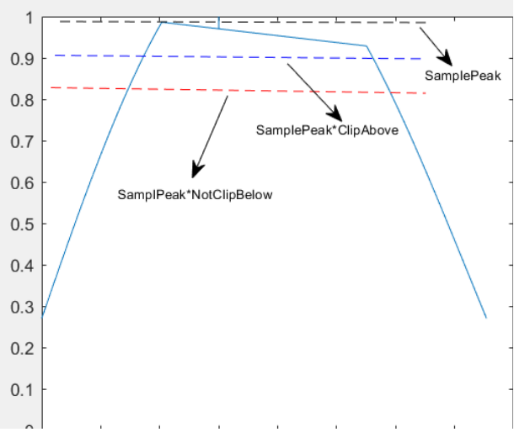
| 5. PeakDisRate | The sample peak is the maximum value of an audio sample over a period of time. Given some anomalous samples, it is reasonable to discard some of the largest samples as sample peaks. Generally, a discard rate of 1 in 10,000 is reasonable. |

In some cases, such as when clipped audio has been transcoded by a lossy codec, or when audio is extracted from damaged CDs, etc., there are some anomalous samples present in the clipped audio, which can affect the algorithm's ability to find the correct sample peak, as shown in Figure 3. The 'PeakDisRate' parameter controls the algorithm to discard some maximum values within the search window in order to find the correct peak sample.
Another trick to achieve better results is: Increase the "InputGain" parameter to make the actual sample peak approach 0dBFS. Then, Figure 3 will resemble Figure 4, and the declipper will find the correct sample peak.
| Setting | Description |
|---|---|
| 6. PeakTime | Length of time window to find the Sample Peak. |
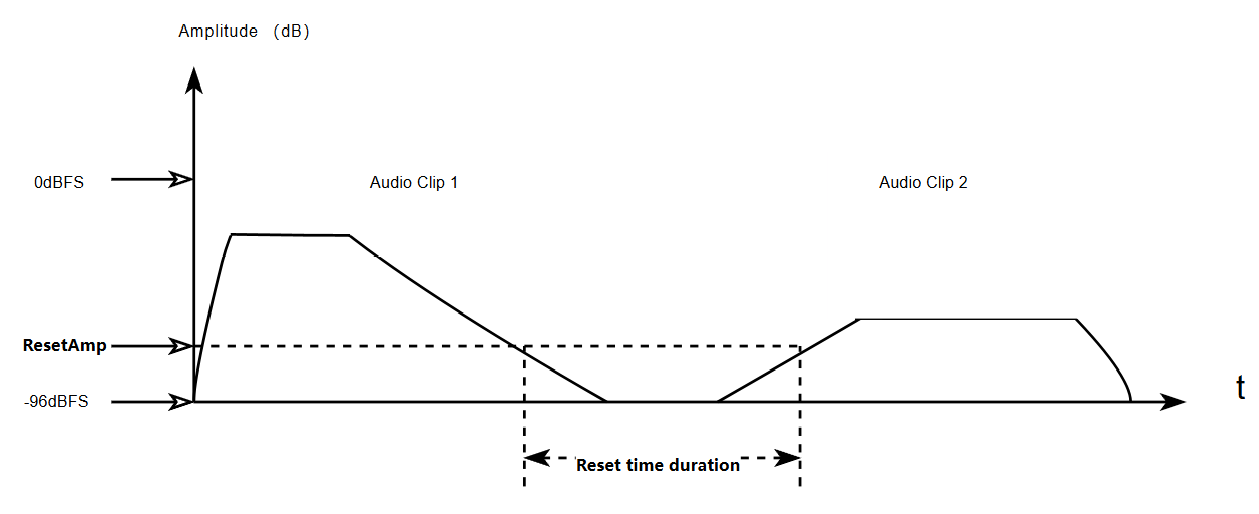
| 7. ResetAmp | For streaming audio, different audio clips usually use muted or low amplitude audio as transitions. Different audio clips may have significantly different clip levels. ResetAmp is used as an amplitude threshold for detecting transition audio. Audio smaller than ResetAmp may be transition audio between different audio clips such as Figure 5. Clip 1 and Clip 2 are different audio clips that may have significantly different clip levels. ResetAmp and ResetTime are used to detect these audio changes and reset some internal states to achieve more accurate detection of audio clip levels for the early portion of audio clip 2. |
| Setting | Description |
|---|---|
| 8. ResetTime | The minimum time for transitions between different audio clips is determined by the ResetTime. If the amplitude of the streaming audio remains consistently below the ResetAmp threshold throughout the ResetTime duration, the detector will consider the subsequent audio as a new audio clip. In other words, if ResetTime less than the rest time duration as shown in Figure 5, Audio Clip 2 will be treated as a new audio clip. ResetAmp and ResetTime can be utilized when you intend to perform batch de-clipping processing on various audio clips. |
Meters of Declipper

Three meters indicate audio amplitude at different processing stages:
- Input meter: Displays audio amplitude with input gain applied.
- Assists in adjusting InputGain so peak level is above -12dBFS for automatic clip detection
- Yellow indicates amplitude considered clipped
- Useful for visualizing clipped levels when adjusting detection parameters
- Restored Audio meter: Indicates audio levels after output gain application.
- Red indicates restored audio has exceeded the Limiter's Peak threshold
- Recommendation: Reduce output gain if levels exceed Limiter's Peak by more than 3dB (unless intentional)
- Output meter: Shows the final audio amplitude after all processing.
- Plugin running mode indicator: Shows whether the DAW is running the plugin in 'RealTime Mode' or 'Offline Mode'.
Tips about Settings and Usage
Tip 1: Real-Time Mode Optimization
Adjust the audio buffer size to prevent glitches (typically >512 samples). The de-clipping process is computationally intensive - insufficient CPU power may cause audio buffer underruns.
Optimize performance by adjusting the Processor parameter to maximize CPU utilization without overloading.
Tip 2: Offline Mode Optimization
For best restoration quality in offline mode:
- Set "SpeedVsQuality" to maximum value
- Set "Look-ahead samples" to maximum value
- Set "Processor" parameter to maximum value to utilize all available CPU cores
Tip 3: Handling 0dBFS Clipped Audio
To provide necessary headroom for restoring audio clipped at or near 0dBFS:
- Attenuate the input audio beforehand, or
- Set a negative post-gain in the OutputGain settings
Tip 4: Known Clip Level Configuration
If you know the specific clip level for your audio:
- Set the appropriate 'ClipAbove' parameter to your preferred clipping level
- Set 'NotClipBelow' to its maximum value
Tip 5: Lossy Codec Transcoded Audio
For audio transcoded with lossy codecs (MP3, AAC, OGG, etc.):
- Slightly increase the 'PeakDisRate' parameter
- Helps the clipping detector find a more accurate clipping level by ignoring anomalous samples
Running Mode
Real-Time Mode
DAWs can run effect plugins in real-time mode, allowing users to hear the plugins' effects in real time.
In real-time audio processing, to maintain real-time performance and low latency, DAWs call plugins to process audio in short blocks, such as every 128 samples. This approach can limit the benefits of multi-processor utilization. For instance, if a plugin requires a minimum processing block of 128 samples for tasks like a 128-sample FFT, and it receives exactly 128 samples, it will be processed by a single processor since that is the minimum audio block size. Consequently, even if your CPU has multiple physical core processors, they cannot be fully utilized in this scenario.
In other words, how many effect plugins can run smoothly in real-time mainly depends on the single CPU core's capacity.
Even though the ProAudioDeclipper plugin is capable of running on multiple processors, it may not gain much benefit when the DAW runs it in real-time mode. It may even reduce the CPU's compute performance if you set the "Processor" parameter to its maximum value in real-time mode, especially when the DAW has many real-time plugins to run, as this can cause the CPU to become busy with scheduling tasks on limited physical resources. We recommend setting the "Processor" parameter to a value between 2 and 8, depending on your actual CPU capabilities.
In real-time audio processing, it’s critical to adjust the audio buffer size in a DAW to prevent audio glitches. A small audio buffer size in a DAW will increase CPU overhead and reduce the CPU’s real computing power. Typically, an audio buffer size equal or larger than 1024 samples should suffice.
Important Note for Real-Time Mode
In real-time audio processing, it’s critical to adjust the audio buffer size in a DAW to prevent audio glitches. A small audio buffer size in a DAW will increase CPU overhead and reduce the CPU’s real computing power. Typically, an audio buffer size equal or larger than 1024 samples should suffice.
Recommendation:Increase audio buffer size larger than 1024 samples in Real-Time Mode.
Offline Mode
DAWs can also run effect plugins in offline mode, allowing users to render audio with the plugins' effects to a file or track for later listening.
In offline mode, a DAW typically processes audio by calling plugins with large data sizes, handling it in blocks of 1024 or even 8192 samples. If a plugin is capable of multi-processor operation, it can divide these blocks into smaller segments—for instance, splitting 1024 samples into 8 pieces of 128 samples each—and then distribute these segments across different core processors for parallel processing. This approach can lead to a significant performance improvement when using multi-core processors.
Since the ProAudioDeclipper plugin has the capability of running on multiple processors, we recommend setting the "Processor" parameter to its maximum value to gain the full benefit of multi-processor use when the DAW runs it in offline mode.
Frequently Asked Questions
| Question | Answer |
|---|---|
| Where is the license window? | Click the "License" tab in the upper-left corner of the interface. |
| Does an online license require a constant internet connection? | No. The software only needs periodic internet access for synchronization. After losing connection, it continues to work for several days. |
| Does a single-user license need to sync periodically? | No. It only requires an internet connection once during initial registration. After that, it runs fully offline. |
| Is there a one-click "best performance" setting? | Yes. Click the "Preset" button; a list of optimized presets appears. |
| Why does the processed audio sound almost identical to the original? | The auto-clipping detector may have missed the clipping. If you are sure the file contains clipped distortion, raise the input gain (e.g., +10 dB). This tells the declipper to treat everything between -10 dBFS and 0 dBFS as clipped and reconstruct it. To keep the restored signal from being clipped again, either lower the output gain by at least 10 dB or disable the limiter. |
Known Issue
N/A
Support Information
For technical support or assistance, please contact MyAudioFactory through one of the following channels: